
Tutorial · Beginner · 22 min
The Obstacle-Avoidance Algorithm: Sense, Scan, Decide, Turn
The decision loop behind an obstacle-avoiding robot: a stop threshold, a servo scan, and a state machine that turns toward open space without getting stuck.
Once a robot can read a clean distance and scan for the open direction, one piece remains: the logic that decides what to do. This is the brain of an obstacle-avoiding robot—a short loop that drives forward, notices when something is too close, looks around, and turns toward space. It is simpler than it sounds, and getting it right is mostly about not getting stuck.
Reactive, not planned
This robot has no map. It reacts to what is in front of it right now: sense, decide, act, repeat. That is reactive navigation, and it is the right first approach—cheap, robust, and enough to wander a cluttered room without hitting anything. It is not the same as path planning, where a robot uses a map to choose a route ahead of time (that is A* on an occupancy grid territory). Reactive avoidance is the foundation; planning comes later.
The stop threshold
Everything hinges on one number: how close is too close? Pick a distance at which the robot stops and reconsiders. Too small and it clips obstacles before it can react; too large and it stops at everything and creeps nervously. The right value depends on speed—a faster robot must react sooner, because it covers more ground before it can stop. For a small robot at a gentle pace, 15–25 cm is a sensible start.
The state machine
A range sensor is what avoids most obstacles; a bump switch is what catches the ones it cannot see, and every robot that runs unattended wants both.
The cleanest way to express the behaviour is a finite-state machine: a few named states with clear rules for moving between them. It replaces a tangle of nested ifs with something you can read and debug. (For the general pattern, see finite-state machines for robot behavior.)
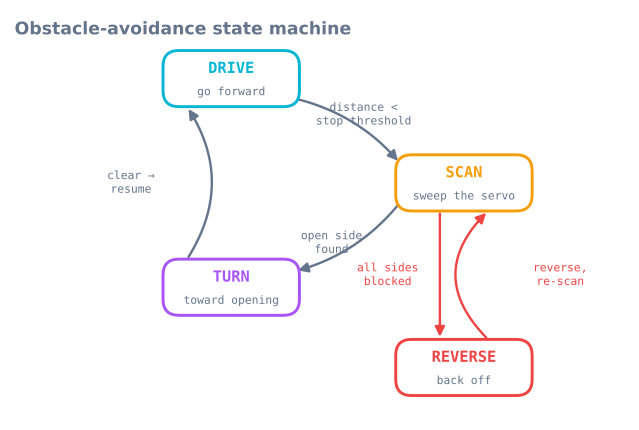
enum State { DRIVE, SCAN, TURN, REVERSE };
State state = DRIVE;
const int STOP_CM = 20;

void loop() {
  switch (state) {
    case DRIVE:
      driveForward();
      if (medianCm() < STOP_CM) { stopMotors(); state = SCAN; }
      break;

    case SCAN: {
      int a = bestAngle();            // servo sweep from the scan tutorial
      long open = distanceAt(a);
      if (open < STOP_CM)      state = REVERSE;   // nowhere to go
      else { turnToward(a); state = TURN; }
      break;
    }

    case TURN:
      if (turnComplete()) state = DRIVE;          // opening cleared, resume
      break;

    case REVERSE:
      backUp(400);                                // ms
      state = SCAN;                               // then look again
      break;
  }
}
Choosing the turn direction
The scan already did the hard part: it returns the most open bearing. Turn that way. The turnToward(angle) call maps “open to the left” to a left pivot and “open to the right” to a right pivot, using differential drive—one wheel forward, the other back, to spin roughly in place.
Avoiding oscillation and dead ends
Two failure modes trap naive robots, and both have simple fixes:
- Flip-flopping between left and right at a corner where both look similar. Add a minimum turn duration so the robot commits to a turn instead of re-deciding every loop.
- Wedging into a dead end where every direction is blocked. That is what the REVERSE state is for: back off, then re-scan. A small stuck-counter—reverse harder if you have scanned several times without progress—breaks the worst traps.
Tuning: speed versus reaction distance
Two knobs decide whether the robot feels smooth or panicky: driving speed and stop threshold. Raise the speed and you must raise the threshold to keep the stopping distance safe — by v·t for latency and v²/2a for braking, which is why doubling the speed more than doubles the threshold. The fastest way to find a good pair is to change them where a mistake costs nothing—the obstacle avoidance simulator—and only then transfer the values to hardware.
Hysteresis: two thresholds, not one
The state machine above uses a single STOP_CM, and that is the first thing to fix. A robot
hovering near one threshold flips between DRIVE and SCAN many times a second, because tiny
measurement changes flip the comparison. It stutters instead of committing.
const int STOP_CM   = 20;   // stop when closer than this
const int RESUME_CM = 30;   // do not drive again until clearer than this
The gap between them is hysteresis, and it forces the behaviour to commit. The same pattern fixes almost every threshold-driven oscillation in robot code, not just this one — an edge detector, a battery-low warning, a docking approach.
A useful rule for the size of the gap: make it larger than your measurement noise plus the distance the robot travels in one loop. For a robot at 0.3 m/s with a 60 ms sensor cycle, that is 18 mm of travel plus a couple of centimetres of ultrasonic scatter — so a 10 cm gap is generous and a 3 cm gap will still chatter.
Committing to a turn
The second oscillation is at the decision level: the robot turns left, the scan now looks different, it turns right, and it dithers on the spot. Two mechanisms fix it:
unsigned long turnStartedAt = 0;
const unsigned long MIN_TURN_MS = 250;    // commit for at least this long

case TURN:
  if (millis() - turnStartedAt < MIN_TURN_MS) break;   // no re-deciding yet
  if (medianCm() > RESUME_CM) { stopTurn(); state = DRIVE; }
  break;
A minimum turn duration stops the robot from re-evaluating before the turn has changed anything, and the resume threshold rather than the stop threshold is what it checks against.
Detecting that you are stuck
REVERSE handles a dead end in front. It does not handle the harder case: a robot that is
technically moving, scanning, and turning, and getting nowhere — a concave corner, or a chair
it keeps circling.
uint8_t scanCount = 0;
unsigned long lastProgressAt = 0;

// Called whenever the robot successfully drives forward for a while.
void notedProgress() { scanCount = 0; lastProgressAt = millis(); }

void escalate() {
  scanCount++;
  if (scanCount >= 3) {
    backUp(800);                    // back further
    pivot(random(120, 240));        // and turn a large, RANDOM amount
    scanCount = 0;
  } else if (millis() - lastProgressAt > 15000) {
    backUp(1200);
    pivot(180);                     // full about-turn
    lastProgressAt = millis();
  }
}
Two design points here are worth naming.
Escalation. The first response to an obstacle is a small turn; the third response to the same situation is a large one. A fixed response repeated is what keeps a robot in a corner.
Randomness. A deterministic robot in a symmetric trap makes the same choice every time and loops forever. A random component in the escape turn breaks the symmetry, and it is the reason the earliest robot vacuums used random bounce rather than a clever rule — it is genuinely robust against traps you did not anticipate.
Reading the bump switches in every state
The state machine as written only checks distance, and every ranging sensor has surfaces it cannot see. A robot with no contact sensing pushes a curtain until the motors stall.
Contact should be handled above the state machine, not inside one state:
void loop() {
  updateBumpers();                       // debounced, from the bump-switch tutorial

  // Contact overrides whatever the robot thought it was doing.
  if (bumpLeft || bumpRight) {
    stopMotors();
    backUp(300);
    pivot(bumpLeft ? +60 : -60);         // turn AWAY from the side that hit
    state = SCAN;
    return;
  }

  switch (state) { /* ... as before ... */ }
}
Note the sign: turn away from the switch that fired. This is exactly why two switches earn their place over one — a single centre switch tells you that you hit something, and leaves the turn direction to chance.
Speed and threshold, as a table
The stop threshold is not a constant; it is a function of speed, because braking distance grows with the square of speed. For a robot with 80 ms of sensing-and-decision latency, braking at 1.0 m/s², a 90 mm radius and a 50 mm margin:
| Speed | Latency term | Braking term | Total threshold |
|---|---|---|---|
| 0.15 m/s | 12 mm | 11 mm | 16 cm |
| 0.30 m/s | 24 mm | 45 mm | 21 cm |
| 0.45 m/s | 36 mm | 101 mm | 28 cm |
| 0.60 m/s | 48 mm | 180 mm | 37 cm |
| 0.90 m/s | 72 mm | 405 mm | 62 cm |
Doubling the speed from 0.3 to 0.6 m/s does not double the threshold — but it does grow it by 76%, and by 0.9 m/s the robot must react at more than half a metre. This is why a robot that avoids reliably at walking pace starts hitting things when you speed it up, and why the fix is a speed-dependent threshold rather than one large fixed value that makes the robot timid everywhere.
int stopThresholdCm(float speedMps) {
  const float latency = speedMps * 0.08f;             // 80 ms
  const float braking = (speedMps * speedMps) / 2.0f; // a = 1.0 m/s^2
  return (int)((latency + braking + 0.09f + 0.05f) * 100.0f);
}
Printing the state is the debugging tool
The single most useful line you can add:
if (state != lastReportedState) {
  Serial.print(millis()); Serial.print(F(" -> "));
  Serial.println(STATE_NAMES[state]);
  lastReportedState = state;
}
Printing on change rather than every loop keeps the output readable, and it turns a robot
that “sometimes behaves oddly” into a transcript you can read. Almost every bug in this
behaviour is visible as a state sequence that does not make sense — a TURN that never ends, a
SCAN that fires forty times a second, a REVERSE that immediately re-enters.
If you cannot answer “what is the robot doing right now” from a single variable, the state machine is not doing its job.
Troubleshooting
| Symptom | Likely cause | Fix |
|---|---|---|
| Stutters at obstacles | One threshold, no hysteresis | Stop at 20 cm, resume at 30 cm |
| Dithers left-right on the spot | Re-deciding mid-turn | Minimum turn duration |
| Loops in the same corner forever | Deterministic escape | Escalate, and add a random component |
| Drives into curtains and cushions | Sound absorbed — physics | Bump switches, handled above the state machine |
| Backs into things | No rear sensing | A rear bump switch, or limit reversing time |
| Avoids well slowly, hits things fast | Fixed threshold, quadratic braking | Speed-dependent threshold |
| Freezes at random intervals | Blocking sensor reads | Non-blocking ping and scan |
| Reverses immediately after reversing | REVERSE re-entered before the scan updated |
Force a fresh scan after backing up |
| Turns toward the wall it just hit | Turning toward the bumper that fired | Turn away from it |
| Cannot tell what it is doing | Nothing prints the state | Print on state change |
Explore the graph
Part of these builds
Projects and learning paths that include this tutorial.
Further reading