
Tutorial · Beginner · 1 hour
Install ROS 2 on a Raspberry Pi and Build a Workspace
Get ROS 2 running on a Raspberry Pi: choose the right OS, install from apt, build a colcon workspace, and make a laptop and robot find each other over Wi-Fi.
Introduction
Nothing in ROS 2 is difficult until you try to install it on a robot, at which point three unrelated things go wrong at once: the operating system is the wrong one, the workspace will not build in the Pi’s memory, and the laptop cannot see the robot’s nodes. None of these are ROS problems exactly, which is why the official tutorials do not warn you about them.
This gets you from a blank SD card to ros2 topic list working from your laptop against nodes running on the robot.
Pick the operating system, not just the board
ROS 2 binaries are built for Ubuntu, not Raspberry Pi OS. Raspberry Pi OS is Debian-based, so the apt packages simply are not there, and every workaround — building from source, Docker, conda — costs you hours before you have written any robot code.
So install Ubuntu Server 24.04 LTS (64-bit) and match it to the ROS 2 release built against it. At the time of writing that pairing is Jazzy Jalisco, supported to 2029; check the installation page for whatever is current when you read this and substitute the name throughout.
Three things to get right at flash time:
- 64-bit. ROS 2 arm64 packages exist; armhf ones do not.
- Server, not Desktop. A robot has no monitor, and the desktop environment costs RAM you want for vision.
- Pi 4 with 4 GB, or a Pi 5. A 2 GB board runs ROS 2 fine but cannot comfortably compile it.
Install ROS 2 from apt
Add the ROS 2 apt source, then install. The repository setup is the part that changes between releases, so this is the shape rather than a snippet to memorise:
sudo apt update && sudo apt install -y software-properties-common curl
sudo add-apt-repository universe

# Fetch and install the package that registers the ROS 2 apt repository and key.
export ROS_APT_SOURCE_VERSION=$(curl -s \
  https://api.github.com/repos/ros-infrastructure/ros-apt-source/releases/latest \
  | grep -F "tag_name" | awk -F\" '{print $4}')
curl -L -o /tmp/ros2-apt-source.deb \
  "https://github.com/ros-infrastructure/ros-apt-source/releases/download/${ROS_APT_SOURCE_VERSION}/ros2-apt-source_${ROS_APT_SOURCE_VERSION}.$(. /etc/os-release && echo $VERSION_CODENAME)_all.deb"
sudo apt install -y /tmp/ros2-apt-source.deb

sudo apt update
sudo apt install -y ros-jazzy-ros-base ros-dev-tools
Note ros-base, not desktop. The desktop metapackage pulls in RViz and the demo GUIs, which a headless robot will never run and which take a long time to install on an SD card. Visualisation belongs on your laptop, where you install the full ros-jazzy-desktop.
ros-dev-tools is what gives you colcon and rosdep. Initialise rosdep once:
sudo rosdep init      # skip if it says the file already exists
rosdep update
Source the underlay, then your overlay
ROS 2 does nothing until its environment is sourced, and this is where most early confusion lives.
source /opt/ros/jazzy/setup.bashThat is the underlay — the installed distribution. Your own workspace, once built, is an overlay on top of it. Sourcing an overlay implicitly brings in the underlay it was built against.
echo "source /opt/ros/jazzy/setup.bash" >> ~/.bashrcPutting the underlay in .bashrc is standard and safe. Putting your overlay there is a trap worth avoiding early: the day you have two workspaces, or you rebuild against a different distribution, every new shell silently starts with a stale environment and you debug a phantom for an afternoon. Source the overlay explicitly, per shell, in the terminal that needs it.
Create a workspace and a package
A colcon workspace is a directory with a src/ in it. That is the whole specification.
mkdir -p ~/ros2_ws/src && cd ~/ros2_ws
ros2 pkg create --build-type ament_python --license Apache-2.0 my_robot
Then build and overlay it:
cd ~/ros2_ws
rosdep install --from-paths src --ignore-src -y
colcon build --symlink-install
source install/setup.bash
Use --symlink-install. It links your Python files into the install space instead of copying them, so editing a node takes effect the next time you run it rather than after a rebuild. On a Pi, where a rebuild is slow, that is the difference between iterating and waiting.
After the build, ~/ros2_ws holds build/, install/ and log/ alongside src/. Only src/ belongs in version control.
Build without running the Pi out of memory
colcon build compiles packages in parallel, one process per core, and each C++ compile can take most of a gigabyte. On a four-core Pi that is four heavy compilers at once, and the build dies with a message about a killed process — or the whole board locks up.
MAKEFLAGS="-j1" colcon build --parallel-workers 1 --symlink-installSlower, and it finishes. Pure-Python packages do not have this problem; it bites the moment you build anything with C++ in it. Adding a couple of gigabytes of swap works too, though on an SD card it is punishingly slow.
Talk to the robot from your laptop
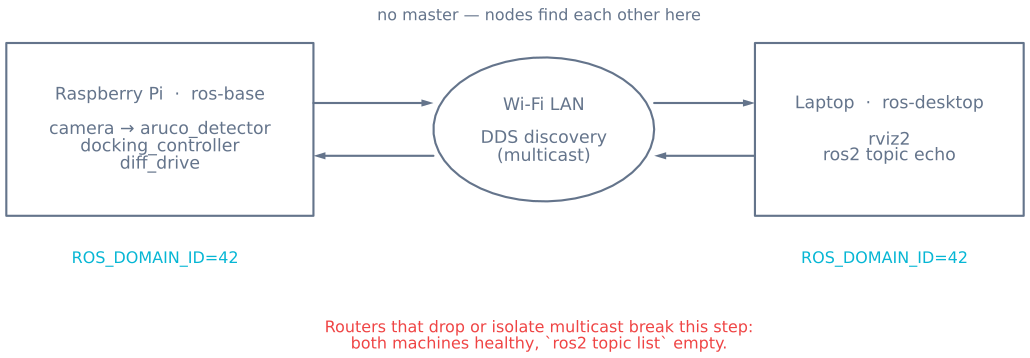
ROS 2 has no master. Nodes find each other by DDS discovery over the network, which means a laptop and a Pi on the same LAN can form one graph with no configuration at all — when it works.
Set the same domain on both machines:
export ROS_DOMAIN_ID=42 # any value 0–101; the same on every machineThe domain partitions the network. Two robots in the same room on the default domain will hear each other’s topics and fight over them, which is a memorable way to learn what this setting does.
Verify from the laptop, with a talker running on the Pi:
ros2 topic list
ros2 node list
ros2 topic echo /chatter
Make discovery survive Wi-Fi
ros2 topic list showing nothing while the Pi is plainly publishing is the single most common ROS 2 networking failure, and it is almost never ROS’s fault.
Discovery uses multicast, and many access points do not forward it. Consumer Wi-Fi routers frequently rate-limit or drop multicast, and “client isolation” or guest-network modes block client-to-client traffic outright. The nodes are running; the packets that would introduce them never arrive.
Work through it in this order:
- Same subnet? A laptop on 5 GHz and a Pi on a guest SSID are not on the same network, however similar the addresses look.
- Same
ROS_DOMAIN_ID, in the shell that is actually running the node? Anexportin one terminal does not reach another, and it does not reach a systemd service. - Try wired. If Ethernet works and Wi-Fi does not, you have proved it is multicast, not ROS.
- Check the firewall.
sudo ufw allow in proto udp from <subnet>on both ends, or disable it while testing. - Fall back to a discovery server. Fast DDS can use a known endpoint instead of multicast — set
ROS_DISCOVERY_SERVERto the robot’s address on both machines. This is the reliable answer on a network you do not control.
One more, and it is a quiet one: keep the clocks in sync. TF2 compares timestamps across machines, and a Pi with no RTC boots to a wrong time. Install chrony on both ends, or every transform lookup fails with an extrapolation error that looks like a ROS bug.
Start the robot’s nodes on boot
A robot you have to SSH into to start is a robot that is switched off. A systemd unit fixes it:
# /etc/systemd/system/my-robot.service
[Unit]
Description=Robot bringup
After=network-online.target

[Service]
User=ubuntu
Environment=ROS_DOMAIN_ID=42
ExecStart=/bin/bash -lc 'source /opt/ros/jazzy/setup.bash && \
  source /home/ubuntu/ros2_ws/install/setup.bash && \
  ros2 launch my_robot bringup.launch.py'
Restart=on-failure

[Install]
WantedBy=multi-user.target
sudo systemctl enable --now my-robot
journalctl -u my-robot -fThe Environment= line matters more than it looks. systemd does not read your .bashrc, so a service inherits none of the ROS variables your interactive shell has — which is exactly why a robot that works over SSH goes silent when it starts itself.
When it goes wrong
| Symptom | Usually |
|---|---|
ros2: command not found |
The underlay was never sourced in this shell |
ros2 topic list empty from the laptop |
Multicast blocked, or mismatched ROS_DOMAIN_ID |
| Build killed part-way with no error | Out of memory — limit parallel workers |
| Your code change had no effect | Built without --symlink-install, or overlay not re-sourced |
| Package not found after building it | Overlay not sourced, or sourced before the build finished |
| TF errors about extrapolation into the future | Clocks not synchronised between machines |
| Works over SSH, dead on boot | systemd service missing the ROS environment |
With the environment behaving, the next question is what to put in it — which is a design problem rather than an install one. Nodes, topics, services, and actions covers choosing between the communication patterns, and TF2 coordinate frames covers the part that catches people after that.
Explore the graph
Part of these builds
Projects and learning paths that include this tutorial.
Further reading