
Tutorial · Beginner · 1 hour
Control a Robot Over Bluetooth With an HC-05 Module
Wire an HC-05 to an Arduino, pair it with your phone, and design a serial command protocol that keeps a robot responsive and safe when the link drops.
Introduction
The HC-05 is the cheapest way to make a robot wireless. It is a Bluetooth serial bridge: whatever your phone sends arrives on the Arduino’s serial port as ordinary bytes, and whatever the Arduino prints goes back to the phone. Nothing in your sketch has to know Bluetooth exists.
That simplicity is the appeal, and it is also the trap. A radio link is not a wire — it drops, it lags, and it disconnects while your robot is still driving. Most of this tutorial is about the difference.
Wiring, and the mistake almost everyone makes
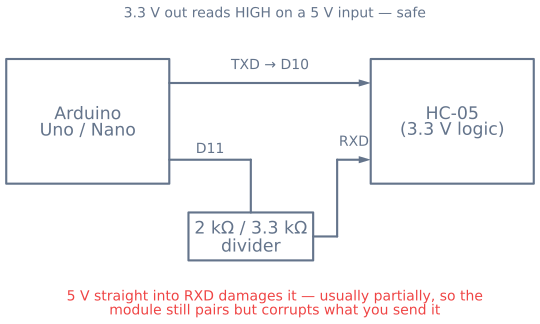
The HC-05 module runs its logic at 3.3 V, even though the breakout board accepts 5 V on VCC. The RX pin is not 5 V tolerant.
| HC-05 | Arduino Uno / Nano | Notes |
|---|---|---|
VCC |
5V |
The board’s regulator handles this |
GND |
GND |
Common ground with everything else |
TXD |
D10 (soft RX) |
3.3 V out is read fine as logic HIGH by a 5 V input |
RXD |
D11 (soft TX) through a divider |
5 V straight in will damage it over time |
EN / KEY |
D9 (optional) |
Pull HIGH at power-up to enter AT command mode |
Drop the Arduino’s 5 V transmit line to 3.3 V with a two-resistor divider — 2 kΩ from the Arduino pin to the HC-05 RXD, and 3.3 kΩ from that junction to ground. It costs two components and prevents a failure that is genuinely maddening to diagnose, because a module damaged this way often keeps half working: it pairs, it transmits, and it silently ignores or corrupts what you send it.
Use SoftwareSerial, not pins 0 and 1. The hardware serial port is shared with USB, so a module wired there fights the serial monitor and blocks uploads.
#include <SoftwareSerial.h>
SoftwareSerial bt(10, 11);   // RX, TX

void setup() {
  Serial.begin(115200);      // USB, for debugging
  bt.begin(9600);            // HC-05 default baud
}
Pairing
Power the robot, and the module’s LED blinks quickly — that is “waiting to pair”. On your phone, pair with HC-05 using the code 1234 or 0000.
Pairing is not connecting. The link only opens when an app on the phone actually opens the serial port. Any Bluetooth serial terminal will do to start with; the module’s LED slows to a double-blink once a connection is live.
Designing the command protocol
The obvious first protocol is one character per command, and it works for about ten minutes:
if (bt.available()) {
  char c = bt.read();
  if (c == 'F') forward();
  else if (c == 'B') back();
  else if (c == 'S') stop();
}
Two things go wrong with it.
It has no speed. Every command is full throttle, so the robot is either stationary or charging. Send a value with the command instead — one letter and a number, terminated by a newline, which is trivial to parse and trivial to type by hand while debugging:
// "F180\n" — forward at 180 of 255
char buffer[16];
if (bt.available()) {
  int n = bt.readBytesUntil('\n', buffer, sizeof(buffer) - 1);
  buffer[n] = '\0';
  char cmd = buffer[0];
  int value = atoi(buffer + 1);
  ...
}
It assumes the message arrives whole. bt.available() becoming non-zero means some bytes are here, not all of them. Reading one character per loop and acting on it immediately will act on half a command. Reading until the newline is what makes the parse reliable.
The failure that matters: losing the link
A wired robot stops when you let go. A wireless robot keeps doing the last thing you told it — which, if the last thing was “forward at full speed” and you have just walked out of range, is a robot going under the sofa at full tilt.
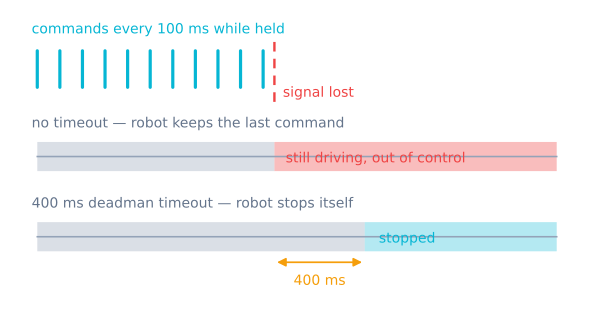
Every wireless robot needs a deadman timeout. The rule is simple: if no command has arrived recently, stop.
unsigned long lastCommandAt = 0;
const unsigned long TIMEOUT_MS = 500;

void loop() {
  if (readCommand()) lastCommandAt = millis();

  // Nothing heard recently? Assume the link is gone.
  if (millis() - lastCommandAt > TIMEOUT_MS) stop();
}
For this to help, the controller has to keep talking. Have the phone send the current command repeatedly — every 100 ms or so while a button is held — rather than once on press and once on release. Then “button released” and “phone went out of range” produce the same safe outcome, and you never depend on a release message that may never arrive.
Use millis() for this, never delay(). A delay(200) in the loop is 200 ms during which no command is read, the timeout is not checked, and the robot is deaf.
AT command mode
To rename the module or change its baud rate, hold EN/KEY HIGH while powering up. The LED blinks slowly — about once every two seconds — which is how you know you are in command mode rather than data mode.
AT              → OK
AT+NAME=MyRobot → OK
AT+PSWD="4821"  → OK
AT+UART=38400,0,0
Commands must be sent at 38400 baud in AT mode regardless of the data-mode baud rate, and most firmware requires both carriage return and newline. If AT returns nothing, that mismatch is almost always why.
Raising the data baud rate is worth doing if you are streaming telemetry back, but leave it at 9600 while you are getting the protocol right — a faster link mostly makes framing bugs harder to see.
Verify before you drive
Three checks, in this order:
- Echo test. Have the Arduino print back whatever it receives. If a typed line comes back intact, the wiring and baud rate are right.
- Parse test. Print the parsed command letter and value. Confirm
F180givesFand180, notFand1. - Timeout test. Send a forward command, then close the app or walk away. The robot must stop within your timeout. If it does not, fix that before putting wheels on the floor.
Once the link is reliable, the same command protocol drops straight into a robot with autonomy: build the wireless layer in the phone-controlled robot project, or move up to the ESP32, which serves a control page over Wi-Fi and needs no app at all.
Explore the graph
Part of these builds
Projects and learning paths that include this tutorial.
Further reading