
Tutorial · Intermediate · 1.5 hours
Drive a Robot From a Browser With an ESP32 Web Server
Turn an ESP32 into a Wi-Fi access point serving its own control page, so any phone can drive your robot from a browser with no app to install.
Introduction
An HC-05 needs a serial terminal app and a pairing dance. An ESP32 can do something better: be its own network and serve its own control page. You connect your phone to the robot’s Wi-Fi, open a browser, and drive. Nothing to install, and it works from any device with a browser.
The ESP32 has Wi-Fi and Bluetooth on the die, two cores at 240 MHz, and enough RAM to hold a web page in flash and serve it. That is the whole trick.
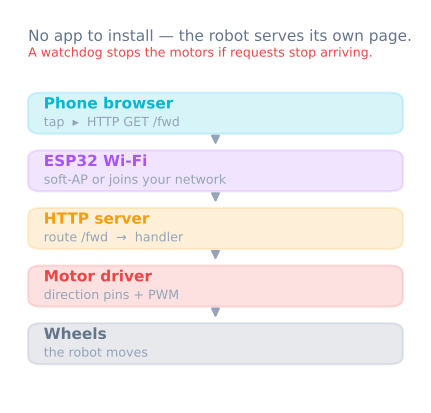
Access point or existing network?
Two modes, and the choice matters more than it looks.
Access point (AP) — the ESP32 creates its own Wi-Fi network and the phone joins it.
- Works anywhere, with no router. The robot is self-contained.
- The phone loses its internet connection while driving, and some phones will silently switch back to mobile data and drop you.
- The address is always the same, typically
192.168.4.1.
Station (STA) — the ESP32 joins your existing Wi-Fi.
- The phone keeps its internet connection.
- The robot’s IP is assigned by the router and can change between boots.
- Useless outside range of that one network, which rules out demos.
For a robot you carry around, AP mode is almost always right:
#include <WiFi.h>
#include <WebServer.h>

WebServer server(80);

void setup() {
  WiFi.softAP("RobotCar", "drive1234");   // password must be 8+ characters
  Serial.println(WiFi.softAPIP());        // 192.168.4.1
  server.on("/", handleRoot);
  server.on("/cmd", handleCommand);
  server.begin();
}

void loop() {
  server.handleClient();
  applyDeadman();                          // see below — this is not optional
}
Serving the control page
The page lives in flash as a raw string. Keep it small — every byte is served from a microcontroller — and make the controls touch friendly, because the entire point is driving from a phone.
const char PAGE[] PROGMEM = R"(
<!doctype html><meta name=viewport content="width=device-width,initial-scale=1">
<style>
  body{font-family:system-ui;margin:0;display:grid;place-items:center;height:100vh}
  button{width:90px;height:90px;font-size:24px;margin:4px;touch-action:manipulation}
</style>
<div>
  <div style="text-align:center"><button data-c="F">▲</button></div>
  <div><button data-c="L">◀</button><button data-c="S">■</button><button data-c="R">▶</button></div>
  <div style="text-align:center"><button data-c="B">▼</button></div>
</div>
<script>
let held = null;
const send = c => fetch('/cmd?c=' + c);
for (const b of document.querySelectorAll('button')) {
  // Repeat while held, so releasing and losing signal look the same to the robot.
  b.onpointerdown = e => { held = b.dataset.c; send(held);
                           b.setPointerCapture(e.pointerId); };
  b.onpointerup = b.onpointercancel = () => { held = null; send('S'); };
}
setInterval(() => held && send(held), 100);
</script>
)";

void handleRoot() { server.send_P(200, "text/html", PAGE); }
touch-action: manipulation on the buttons matters: without it, mobile browsers wait ~300 ms to see whether you meant a double-tap, and the robot feels broken.
The deadman timeout, again
Everything the Bluetooth tutorial says about losing the link applies here, and more so — Wi-Fi range ends abruptly rather than gracefully.
unsigned long lastCommandAt = 0;

void handleCommand() {
  char c = server.arg("c")[0];
  drive(c);
  lastCommandAt = millis();
  server.send(200, "text/plain", "ok");
}

void applyDeadman() {
  if (millis() - lastCommandAt > 400) stop();
}
The browser sends the held command every 100 ms, so a 400 ms timeout tolerates three dropped requests before stopping. That ratio is the thing to tune: too tight and the robot stutters on a weak link, too loose and it keeps driving after you have lost it.
When to move to WebSockets
The fetch approach above opens a fresh HTTP connection for every command. It is simple, it is easy to debug in the browser’s network tab, and at 10 commands a second it is fine.
It stops being fine when you want telemetry back. Polling for sensor values with more HTTP requests doubles the traffic and adds latency to both directions. A WebSocket holds one connection open and lets either side speak at any time:
#include <WebSocketsServer.h>
WebSocketsServer ws(81);

void onWsEvent(uint8_t num, WStype_t type, uint8_t* payload, size_t len) {
  if (type == WStype_TEXT) { drive(payload[0]); lastCommandAt = millis(); }
  if (type == WStype_DISCONNECTED) stop();   // the link closing IS a stop command
}
That last line is the real upgrade. With HTTP the robot can only infer a lost connection from silence; a WebSocket tells you the moment it closes, so the robot stops immediately instead of after a timeout.
Start with HTTP. Move to WebSockets when you want the robot talking back.
Powering it
The ESP32 is a 3.3 V part and draws current in sharp bursts when the radio transmits — well over 200 mA at the peak. Two consequences:
Do not power it from the Arduino’s 3.3 V pin. That regulator cannot supply the transmit peaks, and the symptom is a board that reboots whenever the Wi-Fi gets busy, which looks like a code bug and is not one.
Its GPIO pins are not 5 V tolerant. Anything feeding a signal into the ESP32 from 5 V logic needs a divider or a level shifter, the same as the HC-05’s RX line.
Give it a proper supply from the battery pack through its own regulator, with the motor supply kept separate.
Verify before you drive
- Serve the page. Connect a phone to
RobotCar, openhttp://192.168.4.1, and confirm the buttons appear. - Watch the commands. Print each received command over USB. Hold a button and confirm the repeats arrive at roughly 10 per second.
- Kill the link. Hold forward, then switch your phone’s Wi-Fi off. The robot must stop within the timeout.
Then put it in a robot: the phone-controlled robot project builds the whole thing, either radio, on a chassis that can also drive itself.
Explore the graph
Part of these builds
Projects and learning paths that include this tutorial.
Further reading