
Build a Phone-Controlled Robot Car Over Bluetooth or Wi-Fi
A robot car you drive from your phone over Bluetooth or Wi-Fi, that stops on its own the moment the link drops instead of running away.
What you are building
A robot car you drive from your phone — over Bluetooth with an HC-05, or over Wi-Fi with an ESP32 serving its own control page.
It is the most approachable robot on this site: no control theory, no algorithm to get right, and the failure modes are visible rather than mathematical. It is also the one that teaches a lesson every other robot needs — what to do when you stop being in control.
The two radios
| HC-05 (Bluetooth) | ESP32 (Wi-Fi) | |
|---|---|---|
| Extra hardware | A module, plus a divider on RX | None — radio is on the controller |
| On the phone | A Bluetooth serial app | Any browser |
| Range | Roughly 10 m | 30 m+ outdoors |
| Phone keeps internet | Yes | No, in access-point mode |
| Best for | A first wireless build | Anything you want to hand to someone else |
Neither is wrong. The HC-05 is the shorter path to a robot that moves; the ESP32 is the better experience once it works, because “connect to this Wi-Fi and open a browser” needs no explaining.
Bill of materials
Two routes, and you only need one. Build the Bluetooth version if you already own an Arduino; build the Wi-Fi version if you are buying parts today.
| Part | Bluetooth route | Wi-Fi route | Approx. cost |
|---|---|---|---|
| Controller | Arduino Uno | ESP32 | $5–8 |
| Radio | HC-05 module | Built in | $4 / $0 |
| Level shifting | 1 kΩ + 2 kΩ on the module’s RX | Needed on any 5 V sensor input | $0.10 |
| Motor driver | 1 | 1 | $2–4 |
| TT gearmotor | 2 | 2 | $4 |
| 2WD chassis | 1 | 1 | $6–10 |
| Battery pack | 1 | 1 | $6 |
| Phone app needed | Yes — a Bluetooth serial terminal | No — any browser | — |
Total: roughly $25–35 either way.
The decisive difference is not cost, it is the control interface. An HC-05 gives you a byte stream, so the phone needs an app that can send bytes. An ESP32 serves its own web page, so the phone needs a browser — which means anyone can drive the robot by opening a URL, with nothing installed. For a robot you want to hand to someone else, that is a large difference for no extra money.
The Bluetooth route earns its place when you already have an Arduino, or when you want the simplest possible link with no networking concepts involved at all. A byte in, a byte out.
Build order
1 — Make it drive on a bench. Motors, driver, battery, wheels off the ground, no radio at all. Follow controlling DC motors with PWM and confirm forward, back and each turn with hardcoded commands. Debugging a radio and a motor driver simultaneously is how afternoons disappear.
2 — Add the radio and echo. Wire the HC-05 or bring up the ESP32’s access point, and get text moving in both directions before you connect it to anything that turns.
3 — Join them with a protocol. One letter plus a value, terminated by a newline. Read until the terminator rather than acting on each byte, because “some bytes have arrived” is not “the message has arrived”.
4 — Make it fail safe. This is the step people skip, and it is the one that matters.
The deadman timeout
A wireless robot keeps doing the last thing you told it. If that was “forward at full speed” and you have just walked out of range, the robot does not stop — it commits.
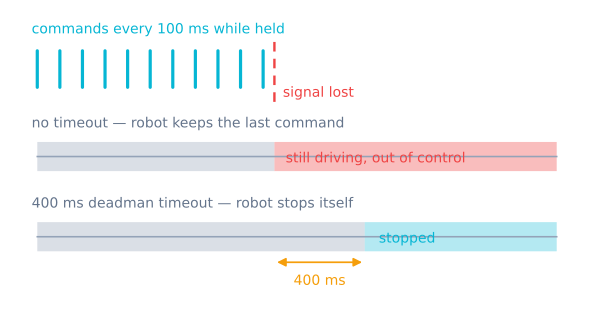
The fix has two halves and needs both:
- The controller repeats. The phone sends the held command every 100 ms, not once on press.
- The robot expects it. If nothing has arrived for ~400 ms, stop.
if (millis() - lastCommandAt > 400) stop();Now a released button, a closed app, a flat phone battery and a walk out of range all produce the same outcome. You are never relying on a stop message that may never be sent.
Use millis() rather than delay() for this. A delay(200) anywhere in the loop is 200 ms during which the robot reads nothing and checks nothing.
Hardware notes
Give the radio a clean supply. Both modules draw current in sharp bursts when transmitting. Sharing a sagging rail with motors causes resets that look exactly like software crashes — the robot stops responding mid-drive and comes back a second later. Feed the motors from the battery pack through the driver, and keep the logic supply separate.
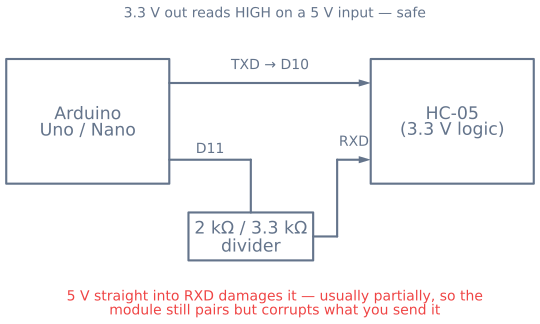
Mind the 3.3 V pins. The HC-05’s RX and every ESP32 GPIO are 3.3 V parts. A 5 V Arduino transmitting into them needs a divider. The damage is gradual and partial, which is what makes it hard to diagnose.
An L298N is fine here. Its voltage drop matters on a robot chasing a line at speed; on a manually driven car you simply compensate with the throttle, so the cheaper, more common driver is the sensible choice.
What good looks like
| Measurement | Bluetooth (HC-05) | Wi-Fi (ESP32) |
|---|---|---|
| Command latency | 20–60 ms | 30–100 ms on a local network |
| Range, clear line of sight | ~10 m | ~50 m, or anywhere on the network |
| Range through one interior wall | 3–5 m | 15–25 m |
| Time to first control after power-on | ~2 s once paired | ~5 s to join Wi-Fi |
| Reconnect after a dropout | Manual, usually | Automatic |
| Deadman timeout that feels right | 300–500 ms | 300–500 ms |
The deadman timeout is the number worth tuning carefully, and both radios need it. Too long and the robot keeps driving for a noticeable moment after the link drops — which at 0.3 m/s and a 1 s timeout is 30 cm of unsupervised travel. Too short and normal packet jitter stops the robot constantly, which feels broken.
300–500 ms is the usable band for both. Below about 250 ms, ordinary Wi-Fi jitter starts triggering it; above about 700 ms, a dropped link is visibly a runaway.
Where this goes next
The command layer you have built is independent of any behaviour layer, which is exactly what makes it a good foundation. Add an ultrasonic sensor and the robot can refuse to drive into a wall even while you hold forward — the beginning of the obstacle-avoiding robot.
That combination, a robot you can drive and that can override you, is also the easiest way to develop autonomy: you can place the robot exactly where a bug happens without walking over and picking it up.
Project roadmap
The build path
Follow the tech tree from parts to a robot that follows a taped line. Each node unlocks when its prerequisites are done, and your progress saves on this device.
0 / 14 done
Components
- ControllerArduino UnoThe forgiving 8-bit board most people meet robotics through.
- CommsHC-05 Bluetooth ModuleWireless serial over Bluetooth—drive a robot from your phone with two pins.
- ControllerESP32A dual-core microcontroller with Wi-Fi and Bluetooth—the wireless step up from an Uno.
- DriverL298N Motor DriverThe dual H-bridge that turns weak logic pins into motor power.
- ActuatorDC Gearmotor (TT Motor)The yellow gearbox motor that turns a bare chassis into a moving robot car.
- Chassis2WD Robot ChassisThe deck two motors, a free caster, and your electronics all bolt onto.
- PowerRobot Battery & Power PackThe difference between a robot that runs and one that keeps resetting.
Tutorials in this path
- Beginner · 1 hourControl a Robot Over Bluetooth With an HC-05 ModulePair an HC-05 with your phone and drive a robot over Bluetooth serial, without the classic 5 V mistake.
- Intermediate · 1.5 hoursDrive a Robot From a Browser With an ESP32 Web ServerServe a control page straight from an ESP32 so any browser can drive the robot — no app needed.
- Beginner · 18 min readControl DC Motors with PWM and an H-BridgeWire and control a brushed DC motor safely using PWM, an H-bridge, and realistic current limits.
- Beginner · 17 min readFinite-State Machines for Robot BehaviorReplace tangled robot conditionals with explicit states, events, transitions, timeouts, and recovery.
Frequently asked questions
Should I use Bluetooth or Wi-Fi for a robot car?
Bluetooth with an HC-05 is simpler to get working and pairs once, but you need a serial terminal app and the range is roughly ten metres. An ESP32 over Wi-Fi needs no app at all — it serves its own control page to any browser — and reaches further, but the phone loses its internet connection while joined to the robot's network. For a first build, Bluetooth is the shorter path; for anything you plan to demo, the ESP32's no-app control page is worth the extra hour.
Why does my Bluetooth robot keep driving after I let go of the button?
Because it never heard the release. A wired robot stops when you let go; a wireless one keeps doing the last thing it was told. The fix is two-sided: have the phone repeat the current command every 100 ms while a button is held, and have the robot stop automatically if nothing has arrived for a few hundred milliseconds. Then a released button and a lost signal produce the same safe outcome, and you never depend on a stop message that may never arrive.
Can I damage the HC-05 by wiring it directly to an Arduino?
Yes, on one pin. The module's logic is 3.3 V and its RX pin is not 5 V tolerant, so an Arduino transmitting straight into it stresses that input. What makes it maddening is that the damage is usually partial — the module still pairs and still transmits, but silently corrupts or ignores what you send it. Two resistors as a divider on that one line prevent it.
Do I need an app to control the robot from my phone?
Only for Bluetooth. An HC-05 needs some Bluetooth serial terminal on the phone to open the port. An ESP32 needs nothing: it creates its own Wi-Fi network and serves an HTML page, so you connect and open a browser. That is the strongest practical argument for the ESP32 on a robot you want other people to be able to drive.
Can a phone-controlled robot also drive itself?
Yes, and it is the natural next step. The command layer you build here is separate from the behaviour layer, so adding sensors lets the robot override you — refusing to drive into a wall even when you hold forward. Build the manual layer first: it is far easier to debug a sensor when you can position the robot by hand from across the room.